
Alt text on X is the image description field you fill in before posting; you add it with the +ALT or “Add description” control, and anyone can view it by clicking the ALT badge or through a screen reader. You get up to 1,000 characters per image, and once you post, that description is locked. No edits, no exceptions. Every image in a multi-photo tweet needs its own description.
TL;DR:
- Alt text can be added easily on mobile by tapping the +ALT button and typing up to 1,000 characters for each image, including multi-photo posts.
- On desktop, the process involves clicking Add description below each image and saving it before tweeting, with a character counter to guide length.
- Once posted, alt text is visible by clicking the ALT badge or through assistive technologies, though it cannot be edited without deleting the tweet.
- Native videos do not support alt text, so captions or descriptive summaries are necessary for accessibility.
- Writing clear, concise descriptions that focus on the most notice-worthy details helps screen readers convey the visual message effectively.
Table of Contents
- How to add alt text on mobile (iOS and Android)
- How to add alt text on desktop or web
- How to view alt text on X
- Limits, editing rules, and special cases
- How to write alt text that actually helps
- Building alt text into your posting workflow
- Nowix perspective: why alt text matters for tech and AI brands
- Let Nowix handle the QA while you handle the launch
- Sources
How to add alt text on mobile (iOS and Android)
Adding alt text on the X mobile app takes seconds once you know where to tap. The button lives on top of the image itself, not buried in a settings menu, so it’s easy to miss the first time.
- Attach your image in the compose window as usual.
- Tap the +ALT button that appears in the corner of the image thumbnail.
- Type your description in the text field. You have up to 1,000 characters.
- Tap Done to save it.
- Tap Post to publish.
If you’re posting multiple images, repeat steps 2 through 4 for each one. X requires a separate description per image, so a four-photo tweet needs four distinct descriptions, not one blanket caption copied across all of them.
For VoiceOver users on iOS, the button announces as “Add description, button” when you swipe to it, and activating it opens the same text field sighted users see. TalkBack on Android behaves similarly, announcing the control and opening a standard text input. Once you’ve saved a description, the button label changes from +ALT to ALT, confirming it took. That visual and auditory confirmation matters. It’s the only signal you get before publishing that the description actually saved.
How to add alt text on desktop or web
The desktop workflow follows the same standard sequence as mobile, but the layout gives you a bit more room to work.
- Click the image icon in the composer and select your file.
- Click Add description displayed beneath the uploaded image preview.
- Type your description into the text box that opens.
- Click Save.
- Click Tweet to publish.
The character counter sits inside that description box, ticking down from 1,000 as you type, so you always know how much room is left. If you’re attaching multiple images, each thumbnail gets its own “Add description” link underneath it. Skipping one means that image posts with no description at all, which is easy to do when you’re moving fast on a launch day and juggling four screenshots at once.
One quirk worth knowing: the ALT badge doesn’t always render identically across every view. It shows reliably in the single-tweet view, but depending on your browser and whether you’re scrolling a dense timeline, it can take a beat to appear in feed view. If you don’t see it immediately after posting, open the tweet directly before assuming something went wrong.
How to view alt text on X
Checking whether a tweet’s image has a description, or reading one yourself, doesn’t require special tools. X built the ALT badge specifically so this information wouldn’t stay hidden.
- Click the ALT badge. Any image carrying a description shows a small “ALT” label in its corner. Twitter rolled this out globally in April 2022, replacing a system where the description was invisible unless you were using assistive technology. Click it and the full text appears in a popup.
- Open the individual tweet if the badge isn’t visible. Feed views sometimes compress the interface; the single-tweet page reliably shows the badge.
- Use a screen reader. VoiceOver, NVDA, JAWS, and TalkBack all announce alt text automatically as users navigate images, no extra click required.
- Try a browser extension. Tools like Imagus can surface alt text inline for sighted users doing manual checks, though behavior varies by browser and extension version.
- Inspect the page source as a last resort. Auditors verifying accessibility compliance at scale sometimes pull alt attributes directly from the HTML when reviewing dozens of posts at once.
Limits, editing rules, and special cases
X caps image descriptions at 1,000 characters, which is generous for most photos but tight for a data-dense chart. Use that space with intent rather than padding it out.
- The 1,000-character limit applies per image, not per tweet.
- Alt text cannot be added or edited after you publish. If you catch an error, your only fix is to delete the tweet and repost with the correction.
- GIFs accept alt text the same way static images do.
- Native video does not support alt text at all. Use captions or an SRT file, or write a descriptive summary directly in the tweet text.
- Deleting and reposting to fix a description means losing any likes, replies, and quote-tweets the original picked up, which matters during a live campaign window.
Pro Tip: Draft alt text before you draft the tweet copy. Writing the description first forces you to identify what actually matters in the image, and that clarity usually improves your tweet text too.
How to write alt text that actually helps
Good alt text answers one question: what would a sighted person notice in the first two seconds of looking at this image? Everything else is optional detail.
Skip generic openers like “image of” or “photo of.” A screen reader already announces that it’s encountering an image, so you’re wasting characters restating the obvious. Lead with the substance instead, describing who, what, where, or why in the fewest words that still tell the whole story.
Match the depth to the content. A simple product photo needs a sentence, maybe two. A chart, dashboard screenshot, or infographic needs the actual data transcribed or a tight summary of the takeaway, since that’s the accessibility approach specialists recommend for anything data-driven. If your screenshot contains readable text, like a tweet, a quote, or a UI label, include that text in the description. A screen reader user can’t zoom in to read it themselves.
Here’s the difference in practice:
| Image type | Weak alt text | Strong alt text |
|---|---|---|
| Team photo | “Image of people” | “Five-person Nowix team celebrating a product launch in front of a whiteboard covered in campaign metrics” |
| Product screenshot | “Screenshot of app” | “Dashboard showing 12,400 impressions and a 340-creator reach for a launch campaign, with the engagement graph trending upward over 3 hours” |
| Chart | “Chart with data” | “Bar chart showing creator sign-ups by week, rising from 40 in week one to 310 by week four” |
| Meme or joke tweet | “Funny image” | “Cartoon dog sitting calmly in a burning room, captioned ‘this is fine,’ representing a marketer ignoring a failed launch” |
Accessibility teams consistently point out that too much irrelevant detail actually hurts screen-reader users rather than helping them. Cramming in background colors, font choices, or minor visual flourishes buries the one sentence that mattered. Keep it tight and prioritize the message a sighted viewer would take away in a glance.
Building alt text into your posting workflow
For a single tweet, remembering alt text is easy. For a brand account posting five times a day, it isn’t, unless you build the habit into your process.
- Go to Settings > Accessibility and enable the image description reminder. This prompts you before posting if you’ve attached an image with no description, catching the mistake before it goes live rather than after.
- Build a short pre-publish checklist: alt text present, embedded text transcribed, one reviewer sign-off before anything with a chart or screenshot goes out.
- Create templates for recurring image types. A product screenshot, a team photo, a data chart. Each gets a description structure you reuse and adapt, rather than reinventing the wording every time.
- Assign one person as the accessibility reviewer for campaign days. Someone has to own it, or it falls through during a high-volume launch.
Pro Tip: If you use a scheduling tool or API to queue posts, check whether it actually injects alt text into the compose box. Because X requires descriptions at the moment of composing, some automation setups quietly skip this step, and you won’t notice until an audit catches it.
Nowix perspective: why alt text matters for tech and AI brands
Accessible descriptions aren’t a compliance checkbox. They extend your reach to screen-reader users who’d otherwise scroll past a chart or product shot with zero context, and for tech and AI brands, that context often carries the entire message. A dashboard screenshot without a transcribed data point communicates nothing. Building the reminder and a review step into your process protects that clarity and keeps you from ever needing to delete and repost mid-launch.
— Knowix
Let Nowix handle the QA while you handle the launch
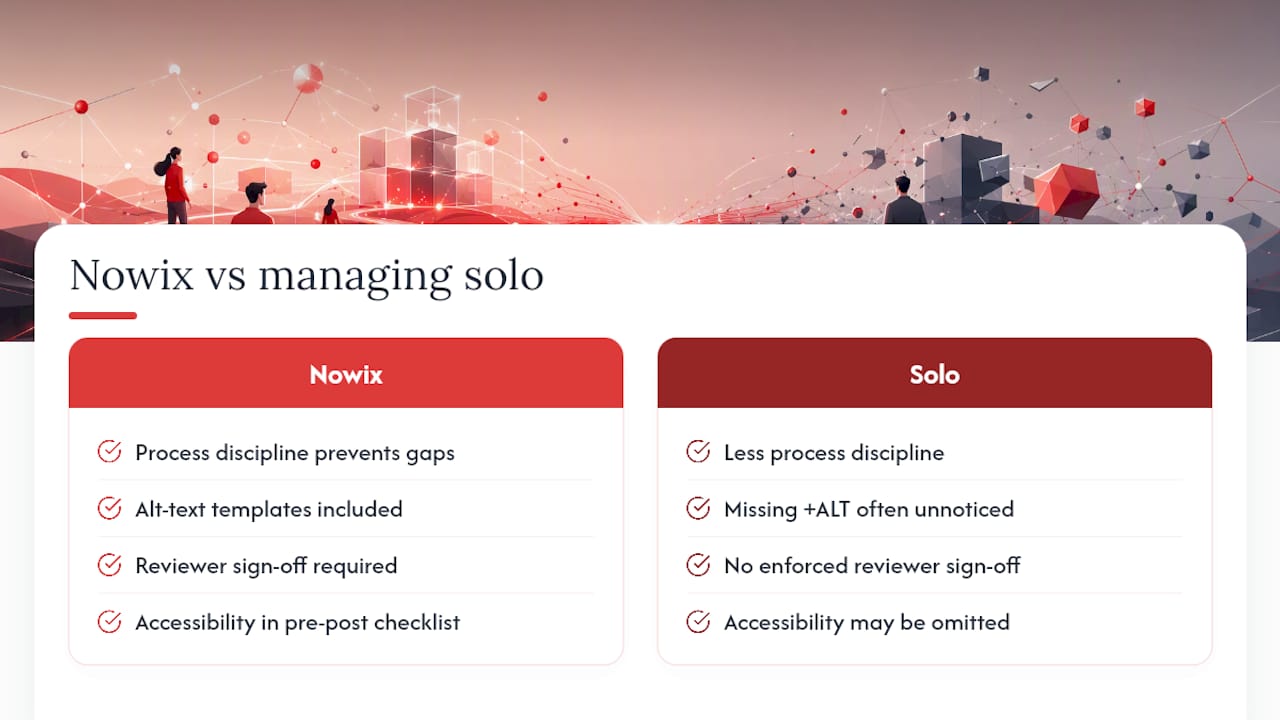
Nowix runs full X account management built around exactly this kind of process discipline, alt-text templates included, so nothing ships without a description or a reviewer sign-off. That’s the real advantage over managing it solo: when you’re coordinating up to 700 creators for a one-hour launch window, nobody has time to notice a missing +ALT tag until it’s already cost you engagement. Our team builds accessibility checks directly into the pre-post checklist alongside brand voice and timing, so a chart or product shot never goes out undescribed.
If you’re planning a coordinated push and want the visuals handled right the first time, our post amplification service folds accessibility QA into the same workflow that manages your creator wave and timeline placement. Reach out and tell us what you’re launching.
Sources
For platform specifics, X’s ALT badge rollout was covered by The Verge in April 2022. For writing guidance, Perkins School for the Blind and Accessible Social both offer practical, platform-specific advice worth bookmarking.
- Twitter rolls out its ALT badge and improved image descriptions | The Verge
- How to add alt text on social media – Perkins School for the Blind
- Alt Text on Twitter/X | Accessible Social
- How to Add Alternate Text to images on X — Nebraska CIO accessibility
- X accessibility guidance — Elgin Community College
Recommended
- How to Launch an AI Product on Twitter: The Founder’s Playbook
- The Startup Checklist for a Twitter Viral Campaign on X in 2026
- Twitter Campaign Examples: 10 Real Campaigns and Playbooks
- Twitter Brand Safety for Tech and AI Marketers
Frequently asked questions
What should an X image alt description include?
Describe the useful visual information in plain language. For charts, include the conclusion and important values; for screenshots, explain the relevant interface state.
Should I repeat the post in the alt text?
Use the description to make the image understandable. Repeating the entire post usually adds less value than explaining the visual information that the post assumes a reader can see.